


The objective of the 1776 British campaign was straightforward: capture New York and crush the American rebellion. The plan was the brainchild of British commander-in-chief Gen. William Howe and the Secretary of State for the American Department George Germain. Howe had every reason to think he would make quick work of it. His invasion was supported by the largest force ever sent to America: 32,000 soldiers, 10,000 seamen, 400 transports and over 70 warships.[1] New York also had a large Loyalist population, and there was unity of command as General Howe’s older brother, Admiral Richard Howe, led the over 400-strong Royal Navy fleet. Of critical importance, the geography heavily favored the British. As shown in figure 1, the New York area was a network of bays, rivers, inlets, creeks, islands, hooks, coves, peninsulas, points and necks giving the British, who controlled the waterways, the initiative of where, when, and how to attack.[2]
A highly detailed eighteenth century British battle map and a detailed accompanying letter by General Howe give insight into the terrain and British tactics. The title of this map is “A Plan of New York Island; with part of Long Island, Staten Island and East New Jersey, with a particular Description of the Engagement on the Woody Heights of Long Island . . . 27th August 1776.” For short, it has been variously referred to as The Howe War Plan,[3] Faden’s Campaign Map,[4] and The Battle of Long Island map.[5]
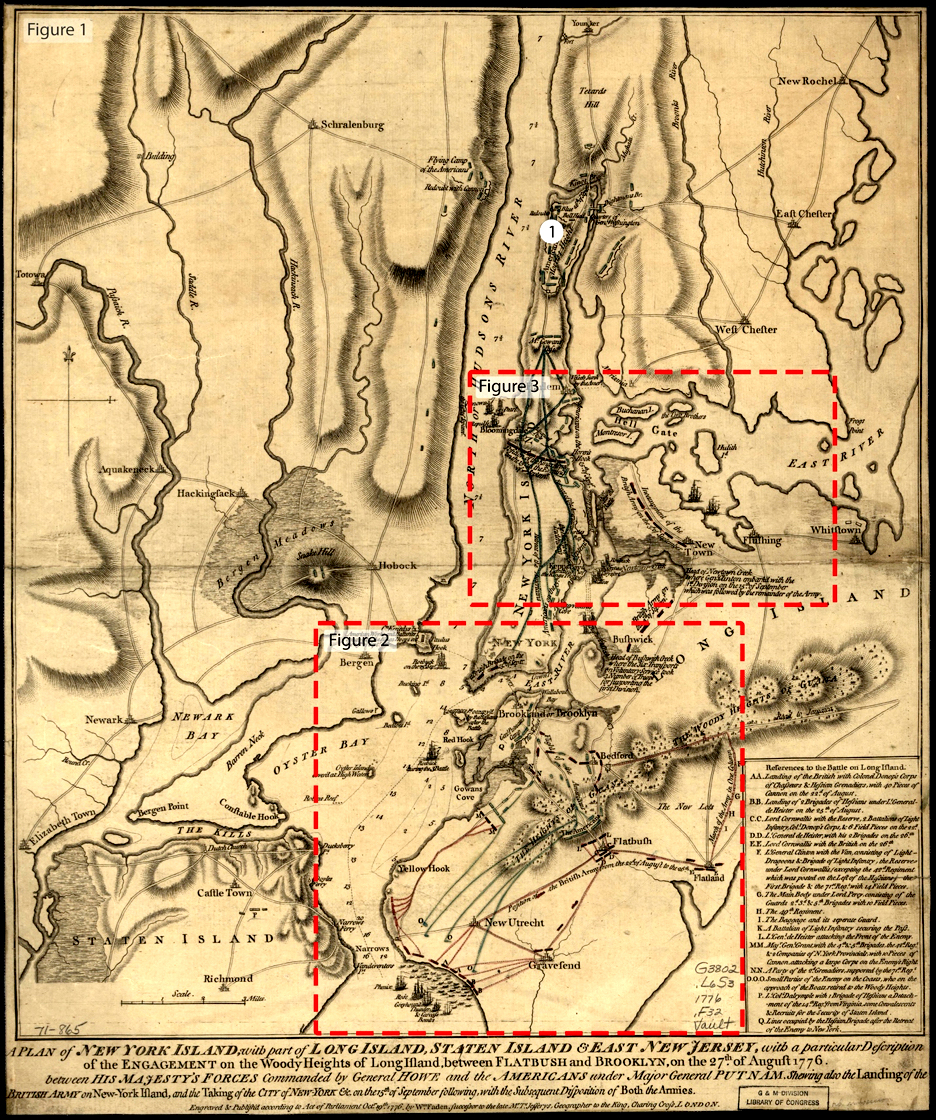
The map was published by one of the most prominent London map makers and dealers of his time, William Faden (1749-1836). Born to a Scottish family, whose name was originally MacFaden or MackFaden, William Faden became an apprentice in London by age fifteen and by 1773 had earned his position as a partner in the map firm of Jeffreys & Faden. In 1776, as the American War of Independence was taking shape, Faden became the sole owner of the business. His timing was perfect as the war created great demand in London for maps of North America, especially battle maps, and Faden’s reputation as a respected map maker and importer served him well. By the time the war ended in 1783, Faden received a royal appointment as Geographer to King George III.[6]

The Howe War Plan map provides superb detail about both terrain and tactics, often down to the level of military units and numbers of cannons. There were five states of Faden’s map, all dated October 19, 1776, although some were published later. Based upon detailed analysis, our map depicts the third state as shown in figure 1.[7] Several versions of Faden’s battle map were also accompanied by a meticulous letter from General Howe to Secretary Germain, dated September 3, 1776. For this article, we have used excerpts from Howe’s accompanying letter to explore his eighteenth century military report as it pertains to the map’s third state.
The campaign map is nineteen by seventeen inches and gives an excellent overall view of the geography of New York harbor and surrounding countryside.[8] It covers the distance from Lower New York Bay, in the south, to north of the upper tip of Manhattan, which is approximately twenty miles. It magnificently shows the intricacy of the multiple waterways and shorelines. In the 245 years since the map was published, some salt marshes and wetlands have been filled in, and some hills levelled,[9] but to all intents and purposes the map of the area today looks remarkably familiar to what Howe experienced in 1776. The modern viewer may also be struck by how many of the geographical names have persisted. For example, on Long Island alone, you can find Brooklyn (or Brookland), Gravesend, Flatbush, Bushwick, Bedford, Red Hook, Jamaica, and Flushing.
To meet Howe’s invading force, Washington had an army of about 20,000 men, but many were untested, including raw militia members. Howe successfully kept General Washington and his army in the dark as to exactly where the British would first attack. As a result, Washington had to make an educated guess where to focus his troop deployment and defenses. By March 1776, Washington committed his troops from Boston, where they had just successfully forced the British to evacuate, to New York to begin work on the city’s defenses.[10] With “a prodigious amount of pick-and-shovel work,” the American troops had constructed strongpoints throughout New York City by the end of August.[11] Yet, Washington had to make a critical decision and ultimately chose to build an additional series of entrenchments and forts on the flat peninsula across the East River on Long Island, between Wallabout Bay and Gowanus Cove (shown as “Gowans Cove” on the map). Thus, while awaiting the British invasion, Washington had fatefully split his American army between Long Island and Manhattan.
The Battle for New York got underway on August 22 when British-Hessian forces made a large-scale amphibious landing at Gravesend Bay on the western shore of Long Island shown as reference points AA and BB, lower center of figures 1 and 2. Howe chose this approach because it provided a broad flat landing beach and was only three miles from his staging area on Staten Island. His immediate objective was to “expel them [the American Army] from New York City and take control of the entire area.”[12] From Howe’s letter, we witness the complexity of his operation: “Early in the morning . . . the covering ships took their stations in Gravesend Bay. The light infantry with the reserve to be first landed, forming a corps of 4,000 men, entered the boats [flatboats, galleys and bateaux] at Staten Island the same time.” The coordination of such large troop movements reflected Howe’s experience and vision for his attack.

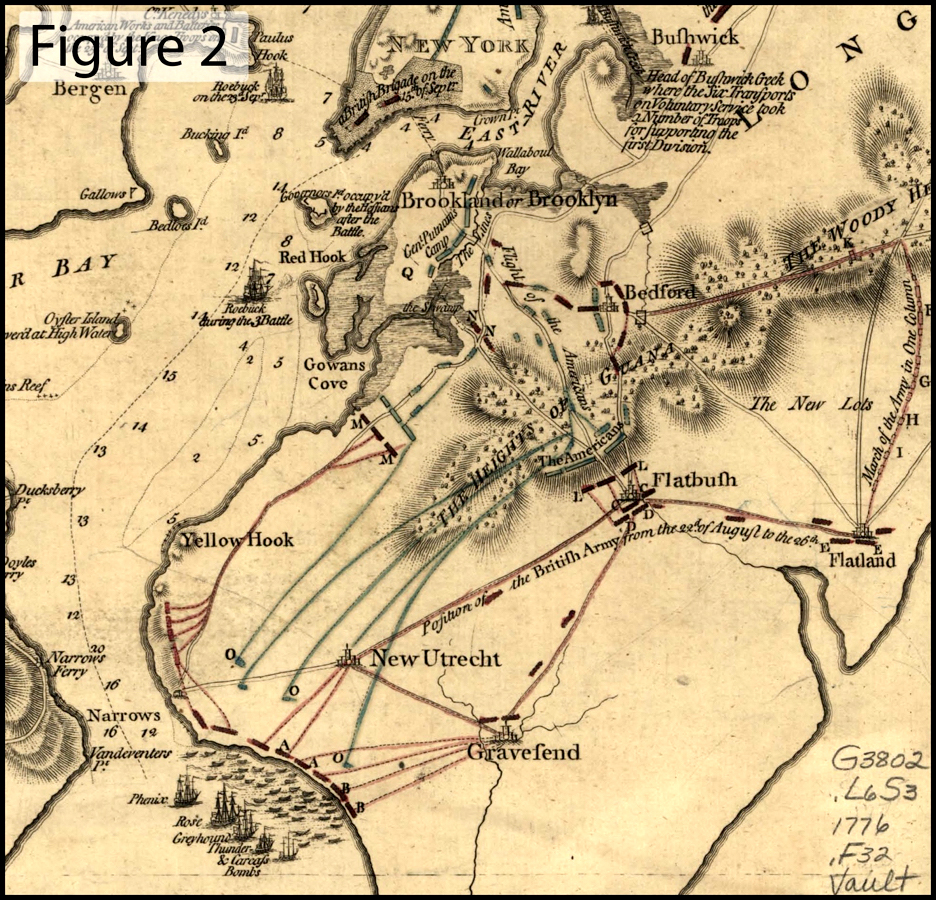
“Small parties” of American troops had been positioned at Gravesend Bay, but “on the approach of the [British] Boats, [the Americans] retired to the Woody Heights” (see reference points OOO, lower center of figures 1 and 2). Thus, the British forces, “not meeting with any opposition,” continued their debarkations as planned. It is a testimony to efficiency of the Howe brothers’ combined army-navy operation that “the whole force destined for this service, consisting of almost 15,000 men, was landed before noon.” When the American troops pulled back to their prepared positions on the heights, the ground was open for Howe’s forces to press ahead. From August 22 through August 26, the British took up a line from Flatland to New Utrecht through Flatbush, “where Cornwallis with the reserve” was positioned as shown in the inset reference CC near “Flatbush” on figure 1 and figure 2. Reports of the size and agility of such a large army amassing must have concerned Washington and his officers.
Interestingly, Howe had considered an alternative to the landing at Gravesend. He had been advised by both Gen. Henry Clinton and Royal Governor William Tryon to land farther north up the Hudson in order to trap the Americans in lower Manhattan.[13] Howe rightfully anticipated several reasons why that might be a more difficult and costly operation. First, to prevent British ships from sailing up the river, the Americans had already established a line of sunken hulks and chevaux de friseacross the narrowest part of the Hudson, from Jeffreys Hook to the Jersey shore. Second, on the promontories above this line, the Americans were at work on the twin strongholds of Fort Washington on the Manhattan side and Fort Constitution (later Fort Lee) on the Jersey side. Admittedly, three Royal Navy warships, Phoenix, Tartar and Roebuck, were able to sail past these defenses several weeks later.[14] These forts are not shown on this state of Faden’s map but do appear in later states (for reader reference, we show the location of Fort Washington with DOT 1 on figure 1). Howe’s assessment may have been prescient because, thirdly, the unarmed, slow moving transport ships and flatboats deploying his thousands of troops fifteen to twenty miles up the Hudson might have been easily interdicted by American guns and obstacles. Fourth, Howe would have also been informed of the Hudson’s strong currents which could reach up to nearly three miles per hour.[15] Finding a suitable landing beach for so large a force would have presented another challenge for Howe as the Jersey shoreline was lined by high palisades, and a landing on the New York side might have easily been contested by rapidly deployed American forces moving north from New York City. Perhaps for these reasons, Howe ignored Clinton and Tryon’s advice and proceeded to Gravesend with his successful attack on Long Island.
General Howe’s operations at Gravesend showcased his brilliant tactics. To distract the Americans on the Woody Heights, two British columns carried out frontal feints. One under Maj. Gen. James Grant “with the 4th & 5th Brigades, the 42nd regt & 2 Companies of N. York Provincials with 10 Pieces of Cannon attack[ed] a large Corps on the Enemy Right” (see reference points MM on figure 2), and the other under Hessian General de Heister, who attacked the American center (LL on figure 2). In the meantime, the main British force carried out a perfectly concealed flanking maneuver, with a “March of the Army in One Column” around the American’s left flank on the night of August 26 (see reference points F, G, H and I on far right of figure 2). The route of march must have been through heavily wooded terrain because Howe’s letter describes “the country not admitting two columns of march.” Lt. Gen. Henry Clinton led the van including the “Light-Dragoons & Brigade of Light Infantry . . . the Reserves under Lord Cornwallis . . . with 14 Field Pieces.” They were followed by “The Main Body under Lord Percy, consisting of the Guards . . . with 10 Field Pieces” with several regiments afterwards and then “The Baggage and its separate Guard.”[16]

Critical to the success of Clinton’s flanking movement was the capture of American scouts posted on the far left of the American position. Thinking that the pass at Jamaica was too far away to warrant defense, only a handful of Americans had been stationed there. As Howe described, “One of his [Clinton’s] patrols, falling in with a patrol of the enemy’s officers, took them; and the General learning from their information that the rebels had not occupied the pass, detached a battalion of light infantry to secure it, and advancing with such a disposition as must have ensured success.” The back door to the American positions on the heights was now wide open, and the British main army burst in. “About half an hour past eight o’clock, having got to Bedford, in the rear of the enemy’s left, the attack was commenced . . . upon large bodies of the rebels . . . who were quitting the woody heights.”[17] At the sound of the guns from the flanking column attacking the American rear, the British and Hessian frontal columns under Grant and de Heister began their attacks in earnest. On the British left, under pressure from Major General Grant’s command (MM on figure 2), “the rebels, suspecting their retreat would be cut off, made a movement to their right in order to secure it across a swamp and creek that covered the right of their works; but being met in their way by . . . the Grenadiers and [other British troops coming up] they suffered considerably; numbers of them however did get into the morass, where many were suffocated or drowned.”[18] Here, Howe referred to the gallant stand by the Maryland and Delaware Regiments under American Gen. William Alexander, also known as Lord Stirling, and to the escape of some soldiers across “the Swamp” and Gowanus Creek. On the map in figure 2, just west of Bedford, there is the notation: “Flight of the Americans,” indicating the route of retreat from the heights to fortifications closer to the East River.
Characteristically, Howe did not press his advantage, and “on the evening of the 27th the army encamped in front of the enemy’s works. On the 28th, at night, broke ground 600 yards distant from a redoubt upon their left, and on the 29th at night the rebels evacuated their entrenchments . . . with the utmost silence . . . leaving their cannon and a quantity of stores in all their works. At daybreak on the 30th, their flight was discovered, the piquets of the line took possession and those most advanced reached the shore opposite to New York, as their rear guard was going over and fired some shot among them.”[19] Howe put the best face on his missed opportunity. He had over 10,000 Americans trapped against the East River but failed to bag them before Washington himself led a silent escape across the river in boats manned by John Glover’s seamen from Marblehead, Massachusetts. The fortunes of war smiled upon Washington that night as a thick fog covered the river, preventing Royal Navy ships from patrolling the river and likely intercepting the evacuation.
Howe understood how difficult it was to replace British forces in North America, and after the carnage at Bunker Hill in June 1775, he prioritized minimizing casualties. Thus, he often adopted tactics of maneuver and surprise, followed by resting his forces for the next engagement. The total losses were lopsided and there are discrepancies in exact numbers of casualties. Howe’s letter reports 1,097 total American prisoners including three generals: Major General Sullivan, Brigadier General Lord Stirling, and Brigadier General Udell. Of the prisoners, nine officers and 58 privates were reported to be wounded. As historian Christopher Ward states, “Howe claimed that the Americans lost 3,200 men in the battle, but American returns . . . showed 1,012 casualties of whom probably 200 were killed, the rest captured.”[20] Howe duly recorded the name of every British officer wounded or killed on Long Island. In addition to the officers, he listed just 53 rank and file killed, 231 wounded and 29 missing for a total of 313. Ward’s accounting reflects a slightly higher count with total British casualties recorded as 392 killed, wounded, or taken prisoner.[21]
After Howe’s victory on Long Island, the general delayed once again for over two weeks before resuming the initiative but then revealed his tactical brilliance once more. With Washington’s forces spread over the length of Manhattan, Howe attacked at the Americans’ weakest point in mid-Manhattan facing the East River. Early on September 15, five warships including Roebuck, Orpheus, Carysfort, the Rose slipped into position just off Kip’s Bay (called “Kepp’s” on the map; see figure 3, lower left). In the meantime, at the “Head of Newtown Creek,” across the East River from Kip’s Bay, “Genl Clinton embarked with the 1st Division . . .which was followed by the remainder of the Army.”[22] At eleven o’clock in the morning, when the Royal Navy ships began to fire devastating broadsides at the Americans in their shallow entrenchments at Kip’s Bay, they panicked and began running toward stronger positions in Harlem as indicated with “Retreat of the Americans” on the road leading north from Kip’s Bay in figure 3. The “Landing of the King’s Troops” that included both British and Hessian forces is shown just below the words “Kepp’s Bay.” West and north of “Kepp’s Bay” is the label “The Heights of Inclenberg,” where Howe rested his advance and took refreshments at the Murray Mansion, home of well-known Loyalists Mr. Robert Murray and Mrs. Mary Lindley Murray.
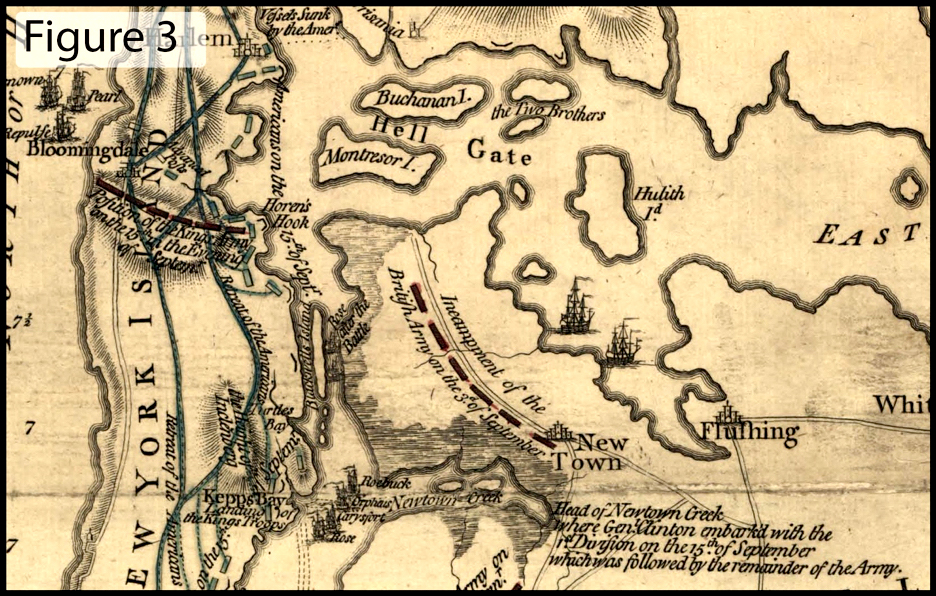
Howe’s pause, once again, provided an opportunity for the Americans; Gen. Israel Putnam and his 5,000 men in New York City escaped north and joined the main American forces in Harlem. This is depicted in figure 1 and figure 3, also labelled “Retreat of the Americans” but this time along the road running up the center of Manhattan. At the end of hostilities on September 15, the Americans had consolidated their position in Harlem Heights, and the British had established a line across the narrow part of Manhattan between “Bloomingdale” on the Hudson River and “Horen’s Hook” (today Horn’s Hook) on the East River. These are shown as red rectangles labelled “Position of King’s Army on the 15th in the evening of Septemr” in figure 3.
At this point, the military actions described by Howe’s letter end, but, on the map, we are treated to important topographical details where subsequent battles occurred later in the campaign. The Battle of Harlem Heights took place on the next day, September 16, in upper Manhattan, north of “McGowan’s Pass” and south of the ground marked “Americans on Morris’s Height.” Between these positions ran a depression, then called the Hollow Way, through which American troops crossed to probe British positions on the southern rim. Then, in mid-October, Howe used a water route in his attempt to outflank Washington again in order to trap the American general in Harlem or to force him to fight in the open north of Manhattan. On the map in figures 1 and 3, one can see this route from Kip’s Bay, up the East River, through “Hell Gate,” named because of its treacherous currents and submerged rocks, and to “Frog’s Point” (only figure 1, right side), a common misnomer for the point called Throg’s Neck then and today.
As officers of the California Map Society, we believe in the power of maps to illuminate history. On all states of Faden’s map, the date and location of publication are shown as London October 19, 1776, a mere five weeks after the invasion of Manhattan on September 15. This was an extraordinarily short time to get the information across the Atlantic and to have the first state of the map engraved and published in England. Faden’s rapid turnaround provides testimony to how the British public thirsted for news about the American War of Independence and the importance of maps to convey that information to them. We hope to have provided further understanding of the terrain and decision making that led to Howe’s victories at the opening of the British campaign of 1776. The Howe War Plan illustrates the dichotomy of General Howe’s tactical brilliance and his characteristic delays that thwarted his ultimate success. In contrast, General Washington was able to maintain the integrity of his army and keep the cause of American independence alive despite these initial defeats. To explore this insightful battle plan at your own pace, we invite readers to our digital exhibit, where you can view the overall perspective and zoom in to reveal important details (www.thedigitalgallery.org/exhibits/40).
 Ronald S. Gibbs, Courtney Spikes, and Thomas Paper are President and Vice Presidents, respectively, of the California Map Society. Gibbs is a Professor at Stanford University School of Medicine and recently published his first novel, The Long Shot: The Secret History of 1776. Spikes is a historical consultant and taught European history at USNA and Loyola Marymount University in Los Angeles. Paper is the Managing Partner of Webster Pacific LLC, a San Francisco-based strategy and location analytics consulting firm.
[1]Kenneth Nebenzahl and Don Higginbotham, Atlas of the American Revolution (Chicago: Rand McNally & Co, 1975), 83.
[2]William Faden, A plan of New York Island, with part of Long Island, Staten Island & east New Jersey, with a particular description of the engagement on the woody heights of Long Island, between Flatbush and Brooklyn, on the 27th of August between His Majesty’s forces commanded by General Howe and the Americans under Major General Putnam, shewing also the landing of the British Army on New-York Island, and the taking of the city of New-York &c. on the 15th of September following, with the subsequent disposition of both the armies, London, 1776, www.loc.gov/item/gm71000865/. All images used in this article derive from this source.
[3]I. N. Phelps Stokes, The Iconography of Manhattan Island, 1498-1909, 6 vols. (1915; repr., Union, NJ: The Lawbook Exchange, Ltd., 1998), 1:353-54.
[4]Robert T. Augustyn and Paul E. Cohen, Manhattan in Maps 1527-1995 (New York: Rizzoli International Publications, 1997), 78-81. Includes the full text of Howe’s letter referenced throughout this article.
[5]Nebenzahl and Higginbotham Atlas, 86-87.
[6]Joel Kovarsky, “William Faden (1749-1836)” in Uncovering the Hidden History of Ameri[c]an Atlas, ed. Lauren Coates (Digital Scholarly Editions, Bethlehem, PA: Lehigh University Press): digital.lib.lehigh.edu/dse/atlas/4/2/0/.
[7]Stokes, Iconography, 1:353-54.
[8]Faden, A plan of New York Island.
[9]Margaret Mittlebach and Michael Crewdson, Wild New York: A Guide to the Wildlife, Wild Places, and Natural Phenomena of New York City (New York: Crown Publishers, Inc., 1997), 46.
[10]Christopher Ward, The War of the Revolution, 2 vols. (New York: The MacMillan Company, 1952), 1:202.
[12]Barnet Schecter, The Battle for New York, The City at the Heart of the American Revolution (New York: Walker and Company, 2002), 116.
[14]David McCullough, 1776 (New York: Simon & Schuster, 2005), 228.
[15]“Tidal Current Predictions,” National Oceanic and Atmospheric Administration, U.S. Department of Commerce, 6 September 2020, www.tidesandcurrents.noaa.gov/currents10/tab2ac4.html
[16]Augustyn and Cohen, Manhattan in Maps, 79 and 81.


3 Comments
Thank you. Every time I return to this campaign, it’s as if I have never looked at a map of the localities before.
Great work. Really appreciate the connections to modern geographical names of the key battle terrain and other locations.
Thanks for the comment. We hoped this article would , indeed, give new perspectives on the opening of the campaign of 1776,