

It was January 1776. In a bold plan hatched in London to end this rebellion, General Sir Henry Clinton was to sail from New York with 2,000 British regulars to the Cape Fear coastline of North Carolina. Meeting him in Brunswick, North Carolina with more troops would be naval commander Commodore Sir Peter Parker and Major General Lord Charles Cornwallis both sailing from Cork, Ireland. Altogether – 53 ships crammed with British military muscle planned to rendezvous in mid-February 1776 to crush the Whigs in the heart of the southern colonies. The result would be that from the Cape Fear valley up to the mountains of North Carolina, the American colonies would be cut in half and under the control of the Crown. The plan also called for the armada to be met on the coast by Scottish Loyalist militia units from the interior regions of North Carolina, “the Highlanders of the Upcountry”[1]
Following Lexington, Concord and Bunker Hill, the royal governor of North Carolina, Josiah Martin, had promised Lord Dartmouth and Lord George Germaine that up to 5,000 loyal Scottish immigrants could be mobilized as the local welcoming committee for the British Army’s southern thrust against the rebels.
Based upon these rosy estimates, General William Howe in Boston, personally chose two veteran officers to travel south to North Carolina and head up the Scottish Loyalist militia – “They were both Scottish and could speak Gaelic.”[2] Major Donald MacDonald was given orders to take command of North Carolina’s military operations. MacDonald would be assisted by his adjutant – Captain Donald McLeod.
The Highlanders Begin Their March to Cape Fear

When MacDonald and McLeod got to New Bern, NC, so much suspicion was raised by local Patriots that the colony’s Committee of Safety asked MacDonald and McLeod what they were doing there. “They explained that they had come only to see friends and relatives, and not for any purpose associated with the British Army.”[3] Nice bluff, but the rebel Carolinians knew something was up and never stopped their espionage efforts against the two British officers. The rebels also knew about Gov. Martin’s push to assemble a large interior Loyalist militia. Martin has assigned that task to Alexander McLean, a Loyalist attorney. McLean had attempted to bring together factions of Highlanders, Loyalists, and ex-Regulators into the cohesive militia that Martin had promised Dartmouth and Germaine … but the Loyalist strength numbers just weren’t anywhere near the thousands that Gov. Martin had over promised. Consequently the militia units that MacDonald and McLeod were to lead were in complete disarray. So much so that only about 500 out of the estimated 1,600 Loyalist soldiers that could be counted upon even had firearms.[4] But they had Scottish broadswords (called “claymores”), kilts, and Loyalist-loving zeal, so what else does a military unit need? Regardless on February 10, 1776, the Royal Highland Emigrant Regiment under the “newly elevated”[5] Brigadier General MacDonald began their slow trek from Cross Creek (present day Fayetteville) near the center of the colony southeast down the foothills and then through the marshy areas, heading toward Brunswick and Cape Fear.
The North Carolina patriots knew about this Royal rendezvous-in-Brunswick plan because as in Massachusetts, it was hard for elements of the Crown to keep anything secret almost anywhere. So in a two-pronged battle plan, Colonel James Moore, commanding a new regiment of soldiers – the First North Carolina Continentals – left out from Cross Creek only a day or so behind MacDonald and his Scottish regiment. At first, the Scottish militia didn’t know they were even being followed. The second prong of the rebel plan was to be initiated by the Wilmington militia units of the Patriots, under colonels Alexander Lillington and Richard Caswell. The Wilmington militia began a march northwest to meet MacDonald head on from the south. Moore’s Continental Army troops would be assisting the Wilmington militia by blocking a Loyalist retreat. The Patriot trap was set!
Approximately 18 miles northwest of Wilmington, advance rebel scouts spotted the Loyalist Highlanders slogging along on the swampy wet road that led to Wilmington. Caswell and Lillington saw that the Scots would have to cross over a creek, at that time estimated to have been nearly six feet deep. The Scots would be crossing over “Widow Moore’s Creek Bridge”[6]. So on February 26, 1776, the night before the battle, the rebels removed the planking from the bridge and greased the log stringer side railings with soap and bear’s grease.[7]
The patriot soldiers also began building earthen mounds and emplacements just past the bridge. They rounded up two artillery field pieces they called “Old Mother Covington and her daughter”[8] and positioned them at breaks in the earthworks. The cannons were sighted in on the path past the bridge, and then the rebels waited in the darkness.

By this time, the elderly and battle-wise Brig. Gen. MacDonald knew that he was being chased by Col. Moore’s regiment at his tail. Under a flag of truce, MacDonald sent a note to Moore ordering him to lay down his arms or “suffer the fate of an enemy to the Crown.”[9] Col. Moore returned a message saying that instead MacDonald should “Take oath to support the Continental Congress or be treated as enemies of the constitutional liberties of America.”[10] Check and checkmate. MacDonald decided to just stay ahead of Moore and try to beat him to the coast and the safety of British guns. As the Loyalist militia trudged, deserters were constantly disappearing off into the woods, reducing MacDonald’s troop strength as they marched. The deserters had thought that they were to be escorted to the coast by British regulars and when they saw that wasn’t happening, the numbers dwindled down to somewhere between 700 – 800, almost all of which were Scots. Then came more bad news. MacDonald fell very ill and had to be sidelined to a bed in a nearby Loyalist farmhouse. The command transferred to the younger Capt. Donald McLeod, MacDonald’s adjutant, who was a much less experienced officer. So when McLeod had conflicting reports of opposing American troop strength and the possibility of a bridge ambush ahead, he turned to Loyalist volunteer Capt. John Campbell. Capt. Campbell said his Loyalist intel pointed to a smaller force of Americans than originally thought. Under the night sky, McLeod gave the order to break camp and move on. With drums and bagpipes playing “King George and Broadswords,” the long-sock Highlanders assembled at 1 a.m. and set out … with over 1,000 well-armed American Patriots waiting for them at Moore’s Creek Bridge.
The Battle of Moore’s Creek Bridge
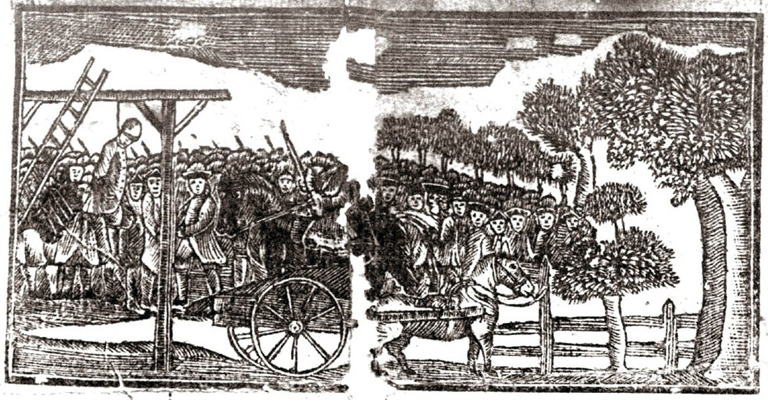
In the foggy pre-dawn of February 27, 1776, a Patriot militiaman spotter saw the approaching Highlanders. He fired off a warning shot and the rebels primed their weapons and themselves. The Scots went into a battle charge mode and reached Moore’s Creek Bridge. Seeing the planking was gone, the advance guard started trying to wade across the creek or cross the bridge using the slippery side stringers, many falling off into the creek and some drowning. A number of the Loyalist soldiers made it to the far side of the bridge and they charged into the night “armed with claymores and dirks.”[11] McLeod, leading the Loyalists, was crossing the bridge on the side railings when the order of “Fire!” was heard from the darkness of the far side. Highlanders fell everywhere with the sounds of gasps and thuds along with the gunfire and cannon explosions. McLeod fell from the bridge, hit with a (later counted) total of 24 musket balls.[12] Capt. Campbell was also killed as part of the estimated 30-50 Loyalist casualties that morning. In shock, the Scottish militia surrendered or just turned and ran. Realizing this, the Americans replaced the bridge planking and took off in pursuit of their foe. The Americans had just two casualties, one wounded and one militiaman from Duplin County killed.
Eventually over 850 Loyalists were caught and arrested from the battle outcome of Moore’s Creek Bridge, with Tory militia officers sent to Philadelphia as prisoners of war. “Wagons, weapons and British sterling worth more than $1 million by today’s value were seized by the patriots in the days following the battle.”[13] The Patriot victory greatly increased recruiting efforts around those parts and, predictable so, really put a damper of Loyalist recruiting until … well, 1780. At the very least, “The defeat at Moore’s Creek was a major setback for the loyalist cause in the south.”[14] Col. James Moore, commanding the chasing Continental Army regiment, was late to the battle because, as he put it, “The battle lasted three minutes.”[15] But as for North Carolinians, “This dramatic victory ended British rule in the colony forever.”[16]

Battlefield Review
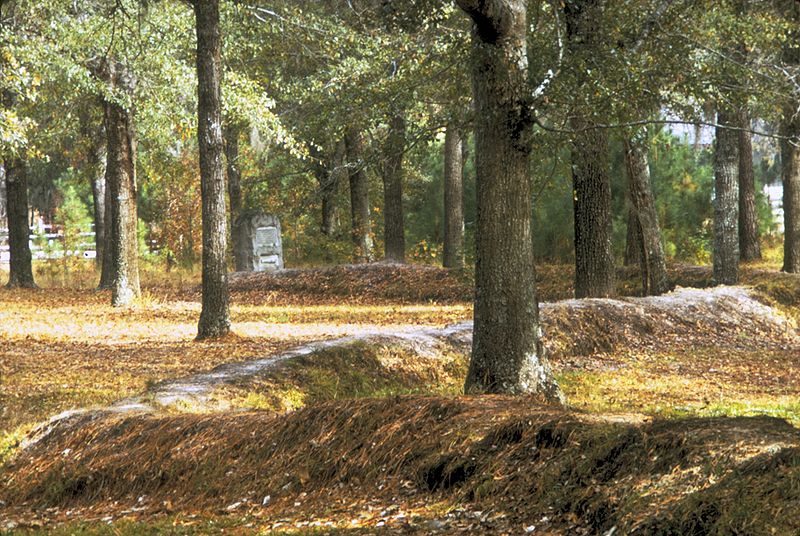
In North Carolina, Moore’s Creek National Battlefield has pretty much played second fiddle to the better-known Guilford Courthouse site. But this small, excellent park is well worth the visit. About 18 miles northwest of Wilmington and situated off of I-40 (just follow the signs), the intrepid RevWar buff will find a beautiful, compact park staffed by extremely knowledgeable and friendly National Park Service personnel. The small visitor’s center and museum are great, along with the well-stocked gift shop! A good introductory film is shown in the visitor’s center to set the stage for school groups and visitors. The ADA- compliant walking trails are a delight, beautifully manicured and are an easy stroll complete with benches and interpretive signage along the paths. With the rural serenity of the park, the area could double as a meditative retreat. Camping sites for the use of Boy and Girl Scouts are available, along with the use of free covered picnic shelters for the community.
For well over 100 years, the local community has greatly supported this great battlefield park. The battle is re-staged annually on the last full weekend of February. The NPS says, “The event features living history encampments, weapons demonstrations, colonial and military music and a wreath laying ceremony.”[17] (The author visited this battlefield park in July 2012).
[1] David Lee Russell, The American Revolution in the Southern Colonies, (Jefferson, NC: McFarland & Company, Inc. Publishers, 2000), 78.
[2] Russell, The American Revolution in the Southern Colonies, 79. Many secondary sources indicate that both men had been wounded at Bunker Hill, but there is no evidence that they were; it appears to have been a cover story that they gave to explain their presence in North Carolina; see, for example, Hugh F. Rankin, The North Carolina Continentals (Chapel Hill, NC: The University of North Carolina Press, 1971),33.
[6] Russell, The American Revolution in the Southern Colonies , 80.; this colloquial term is also found in a report written by Col. Caswell: “… we had an engagement with the Tories at Widow Moore’s Creek Bridge on the 27th current.” From J.D. Lewis, NC Patriots 1775-1783: Their Own Words, Volume 2, Part 1 (Self-published e-book, jd******@******na.com 2012), 28.
[8] Charles E. Hatch, Jr., The Battle of Moores Creek Bridge (Washington: National Park Service, 1969), 37-47.
[12] New York Packet, March 28, 1776; Pennsylvania Evening Post, March 23, 1776. http://www.historycarper.com/1776/03/23/battle-of-moores-creek/ Account of the battle at “Widow Moore’s Creek bridge” by Col. James Moore. (Accessed Dec. 8, 2013).
[13] National Park Service, Moores Creek National Battlefield, http://www.nps.gov/mocr/extend1.htm (accessed Dec. 8, 2013). (The NPS has published a style notation that it does not use an apostrophe in the word “Moores”. The author has otherwise fallen back on the old tried and true style of apostrophe use anytime a possessive noun is used). Other sources cite the specific amount of £15,000 British sterling as having been captured in a locked case following the Battle of Moore’s Creek Bridge.
[14] Andrew Jackson O’Shaughnessy, The Men Who Lost America: British Leadership, the American Revolution, and the Fate of the Empire (New Haven & London: Yale University Press, 2013), 217.
[15] New York Packet, March 28, 1776; Pennsylvania Evening Post, March 23, 1776. http://www.historycarper.com/1776/03/23/battle-of-moores-creek/ Account of the battle at “Widow Moore’s Creek bridge” by Col. James Moore. (Accessed Dec. 8, 2013).
[16] National Park Service, Moores Creek National Battlefield, http://www.nps.gov/mocr/index.htm (accessed Dec. 8, 2013).
[17] National Park Service, Moores Creek National Battlefield, http://www.nps.gov/mocr/planyourvisit/things2do.htm (accessed Dec. 10, 2013).


5 Comments
Thanks for an engaging article about one of the lesser known “battles” of the War. It’s interesting to note how dramatic the civil war nature of the Revolution was in the South, as early as January 1776 and that the British were also interested in cutting off the southern colonies just as they’d later try to do using the Hudson River. What happened to MacDonald? Was he one of the Tory officers captured? Also, did Clinton send his ships or had the disaster cancel his operation?
Steven – thank you for the kind words! Great questions, too, so let me follow up on those two aftermath things. MacDonald, who had received a promotion to brigadier general of the NC militia, was indeed taken prisoner by Col. James Moore. According to NC state archive records, MacDonald insisted upon surrendering his sword to Moore, who (as you probably know) accepted it and returned it back to MacDonald as was the gentlemanly conduct of the time. MacDonald was sent to a holding jail in Halifax, NC and then on to Philadelphia as a prisoner of war. In fall 1776, MacDonald was part of an officer prisoner exchange for American generals Lord Sterling, William Alexander and John Sullivan. MacDonald spent the remainder of the Revolutionary War either in North America or Nova Scotia. The records are unclear.
I must put in a word for Don Hagist at this point! Not only would Don probably know where MacDonald spent the remainder of the war, but Don was instrumental for me during the research and writing of this article. Don’s excellent British army records dispelled that popular notion that both MacDonald and his aide McLeod were wounded Bunker Hill veterans. The real British army records do not support this and Don relayed that MacDonald and McLeod used that excuse as a cause for visiting relatives in NC! Another myth busted by solid research!
The British expedition to Halifax, NC to link up with the Loyalists had been held up by a late start in Cork, Ireland and then by bad Atlantic weather. The fleet and soldiers didn’t show up off of Cape Fear until May 1776. Not wanting a perfectly good army and navy to go to waste, Clinton redirected them toward taking Charleston, SC. As we know that first attempt was also deflected and the whole southern campaign was put on hold until the last phase of the war.
A very thorough and interesting article. This piece made a little-known part of history come alive — even for a non-history buff!
I agree with John on visiting the battlefield. It is a nice small battlefield and easy to visualize the fighting. Good job on the article. Enjoyed it.
Thank you, Tim. The park rangers were very helpful and historically informed. It was a very pleasant and serene park visit; a jewel near Wilmington, NC.